How to Do a Self-Tape for Commercial Castings
Once upon a time, unheard of was the notion of doing a self-tape for a commercial casting. Remember the era of: “Oh you can’t make it to this last-minute allotted time slot in the middle of a Tuesday… which is tomorrow? Oh well, maybe you’ll get the next one.”
Things certainly have changed, and since the pandemic struck, I feel like I’ve done more commercial self-tapes than I’ve had hot meals. And I’ve been fortunate enough to have received call-backs and booked several from them too! Here is a step by step guide to how I approach every commercial self-tape.
PRO TIP: Right off the bat, I will reveal my number one PRO TRICK I use with every single self-tape I do, commercial or not – Our aim is to really try and emulate what would happen were you to go in for the audition in person. Yes, you are doing all this from your home or a private studio, but the closer you can get to submitting a tape that resembles the professional quality of an in-room audition, both in performance and filming technicalities, the better your chances of booking the job!
Step 1: Read The Material Provided
First, your agent will send you the brief from casting.
You’ll notice there will be several links for more information including the director’s pitch and vision, the script, shooting dates, remittance offered, contractual details, AND…
YOUR CHARACTER DESCRIPTION!
In a commercial casting, the characters are commonly broad and simple archetypes like, MAN, FEMALE, DAD, MUM, Burger Guy, Coffee Girl and so on and so on. The brief will then go into more detail as to the personality they are seeking for the project.
Of course, you MUST read through all of the material before you start to record the test and prepare just as you would were you going into the actual audition room. Take note of the particulars they mention including points of sales focus, potential gags, and overall tone for the project. It’s these particulars that they are hoping you will nail in your test.
These days, most wonderful and benevolent casting directors provide a bespoke How-To guide they have filmed specifically for this commercial, explaining almost EXACTLY what they want to see you do in your self-tape. FOLLOW THESE INSTRUCTIONS – they are your best friends. And trust that if you bring YOURSELF to what they are asking for, you will already be unique – because you can guarantee that the gem absolutely no one else will be bringing to their tape is YOU!
PRO TIP: Do not think that just because you are shooting your audition yourself that you don’t have to DRESS THE PART. The casting brief may provide some costume suggestions and they really do value the actor who pays attention to this. Depending on the role, they may even ask you to have fun with your wardrobe choices, and you should – GO FOR IT! Obviously, within reason. You don’t have to go out and buy a racecar driver’s jumpsuit just for the audition (although that would be an actor’s tax deduction, self-tape or otherwise, just so you know), but anything you can wear to help bring the character to life is always a wise choice.
Step 2: The Set-Up
I reiterate – the most professional approach to filming a self-tape is to try and emulate the type of clip that would have been shot in person in the actual audition room. I’m sure many of you are now saying: “But I don’t have the sort of fancy lights and newfangled recording equipment that the professional casting directors use!” Guess what? Neither do I, and my successful castings have all come from using nothing but utterly inexpensive sunrays and the camera on my phone.
Of course, if you have access to a more sophisticated setup, then by all means shoot your tests at that level! But if you don’t, fret not, as this is truly not a deal-breaker or a hindrance to your chances of booking the ad.
The following imperatives to a commercial casting can be easily attained BUT MUST BE ADHERED TO.
LOCKED OFF & LANDSCAPE (sideways)
Whatever camera you use to record yourself MUST BE LOCKED OFF. And there are some marvellous methods actors have utilised to mount their devices – like stacks of books, binder/bulldog paper clips, lots of blu tack – you have options.
Once you have devised your miraculous mounting method, the camera MUST BE recording your scenes in LANDSCAPE.
Remember – this is not a TikTok post, or some sort of a selfie vlog. This is a professional submission for a job for which you hope to be paid – construct your self-tape to reflect this. Film in LANDSCAPE.
BLANK BACKGROUND
Have you ever noticed how in an audition room you’re always standing against a blank wall? That’s because all they want to see is YOU and your performance – nothing else. Make sure that when you film your test the background is totally blank, no picture frames or furniture behind you – nothing. You don’t want to include anything in the background that may distract the viewers from YOU.
CLEAR LIGHTING & SOUND & EYE-LINE
Commercial casting directors are fairly forgiving when it comes to the quality of the lighting and sound of your self-tape, as they are generously aware that you are creating the test with potentially limited resources and in audibly compromised venues. BUT TRY AND DO YOUR BEST HERE.
They NEED to see and hear you in order to evaluate your submission appropriately. And, most importantly, ensure that your eye-line is close to the camera (not right down the barrel, but perhaps just to the side of your chosen filming device). When you are too much in profile, the viewer struggles to see your eyes, and this is usually the window to your reliability and performance. Remember: The eyes are the windows to the soul… and usually when you’re the face of a sales campaign, they want to put a relatable HUMAN front and centre, and that is typically emanated from your dazzling gaze.
Step 3: Filming
There is no specific order in which you have to film the content you are eventually going to edit together before submitting. But I always start with filming my identification slate and taking any still photography commonly requested (see below for specifics).
Click here to read another article about how to nail your self-tape slate – this includes my little trick to shooting a frequently requested Full Body Shot all by yourself.
PHOTOGRAPH REQUESTS
You will often be requested to include a few still photographs with your submission. These tend to include:
A Selfie Headshot & Full body shot – Those of you who have attended an in-person commercial audition will be familiar with the photos they take of you on arrival. These requested stills are the at-home equivalent. Casting will use these as the most up to date references of your appearance, and usually refer primarily to these images during their planning.
Hands – back and palm – depending on what we are advertising, our hands will be featured in a close-up holding the particular product. Often we are required to provide pictures of our hands from the back and of the palms to further assist the casting process.
PRO TIP: Take these still photos right away. Apart from the fact that you usually look your best at the beginning of the audition, we also tend to become so relieved that we’ve finished the performance at the end of filming that we forget to take those pictures and have to get all gussied up again. Save yourself the stress. Get them done at the beginning! AND when you upload them to the computer later, label them right away – just to avoid having to scrounge around your myriad files for the correct IMG_986002397…
Now it’s time for shooting the actual scene! The best advice I would have for this part of the process is to follow the brief and HAVE FUN! As I said before, we are being considered for the position as a brand ambassador, in some cases, your appearance and performance will be splayed across the client’s sales content. Casting directors are charged with finding that special energy that will be perfect for selling the product – so if you’re having fun while acting, the viewer will have fun while watching.
PRO TIP #2: Limit yourself to about 3-4 takes of any scene. This might seem too few to some of you as we think we need to send the perfect take – but the truth is there is no “perfect take”. When it comes to evaluating yourself and your work, it is obviously incredibly hard for us to stay objective, so this suggested rule is in part to assist with your mental endurance as well. Rarely in the actual audition room will you be asked to provide more than three takes of the one scene. While sometimes we may walk out thinking: “ugh, if only I had this or I wish I had done that!”, on the flip side it is rather liberating to be able to also shrug such anxiety off and know that no matter how many takes you were given, it was never going to be perfect – it’s all just process and fun. Personally, I pretty much cap it at 3 takes. Sometimes if I’m content with one or two I even stop there.
Step 4: Editing
Oh my! Editing! Don’t be intimidated – this process is made rather easy these days and any sort of movie-making software already installed on your computer or phones will suffice, or you can purchase more sophisticated programmes if you so choose and know how to use them. However, self-tapes really don’t require an advanced skill level to edit.
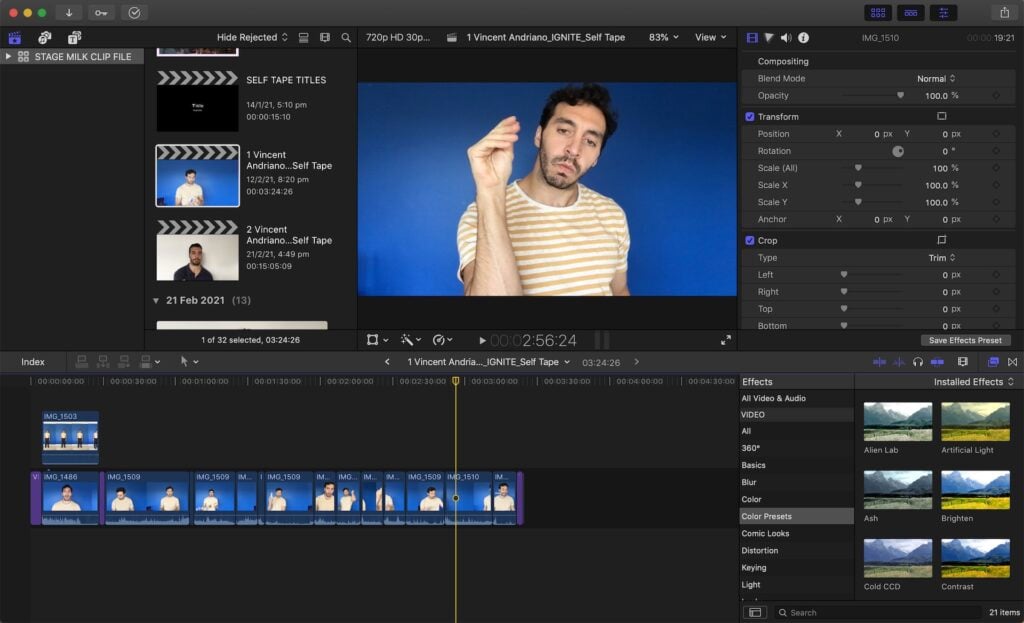
Now there are plenty of tutorials on YouTube as to how to use your chosen editing software, but below I have provided some screenshots of me editing a self-tape of mine using Final Cut X.
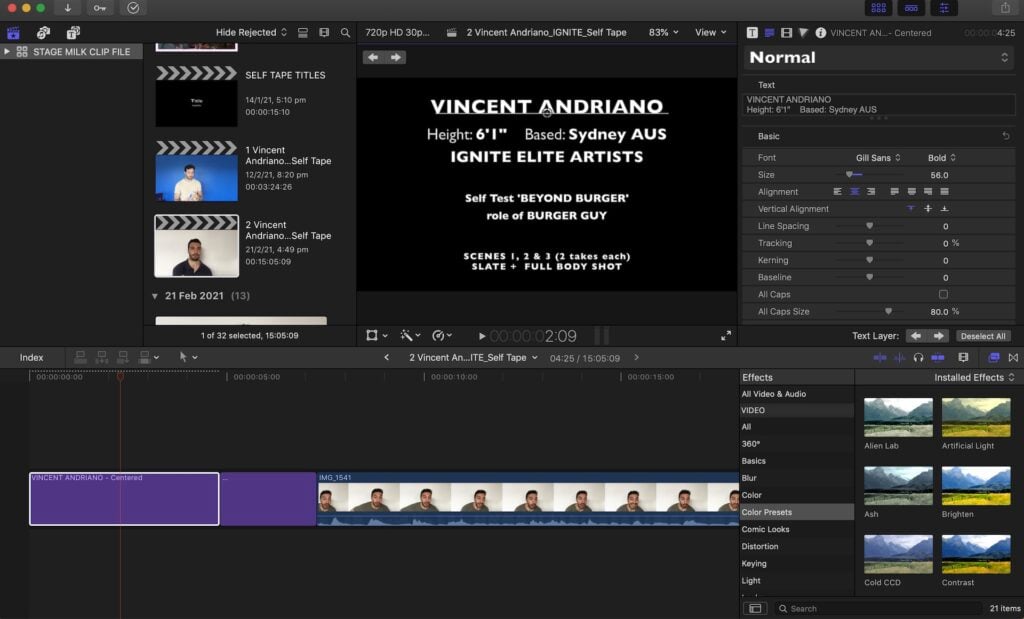
First, I import the footage from my phone to the chosen editing programme, and I pick my favourite takes to submit.
Then I drag them into the editing timeline and put them all in order. The casting brief will probably outline in what order they prefer the slate and the scenes, so look out for that. Although, it shouldn’t matter too much if you open or close your tape with the identification slate, just as long as it’s there and you’ve provided them the information they requested. (Typically this will include details like name, age, agent, height, availabilities for the shoot dates, and whether you have previously appeared in anything competitive).
PRO TIP: Remember to trim either end of each scene to remove any unwanted footage of you pressing the button to start and then stop the recording. This might seem obvious to some readers, but many believe its an unnecessary added level of work for what is essentially an unpaid application process. Again, in our efforts to emulate the in-room audition, we have to remember that the casting directors will stop recording before they call cut so that they can end the clip with you still in character. That’s what we are trying to accomplish as well with our self-tapes, and we don’t shatter the illusion
Once I’m happy with the order and the trim of the collective scenes, I add a title card at the beginning of the clip with the following information.
This is not an especially required practice, and there are various schools of thought as to whether we should include these at all. Personally, I think it adds a professional touch to the submission, but it’s really up to you.
Finally, I watch the whole thing once through, just to make sure I have everything included in accordance with what was asked in the brief, and that I’m happy with the video as a whole. Once satisfied, I EXPORT the whole project.
PRO TIP: You are often asked to limit the file size of your submission to anything between 50-100MB. This can be challenging for us less technologically savvy. Again, it depends on the programmes you choose to use for the edit, or additional file resize programmes to which you may have access. And again, if you are struggling with this aspect, there are loads of free online tutorials that can guide you through a step-by-step process. And trust me, when you learn a good method once, you tend to become very quick and deft at repeating it.
Step 5: Sending it Off!
So we’ve come to the end! We’ve got our picture and video files all labelled and ready to go!
Next, its time to follow the same links we would have to anyway for an in-room casting and fill out the online wardrobe forms provided. Here there will be specific sections provided for you to upload your pictures and videos. Once you’ve completed the form, and click ‘submit’, YOU’RE DONE!
It’s that easy. You should get an automatic confirmation email from casting to let you know you’re submission has been received.
THREE MOST IMPORTANT TAKEAWAYS…
If there were three crucial points you should never forget when filming commercial self-tape it’s these…
- READ AND FOLLOW THE INSTRUCTIONS
- TRY TO EMULATE WHAT IT WOULD BE LIKE IN AN IN_ROOM AUDITION WITH YOUR TAPE.
- HAVE FUN! It’s always more enjoyable to watch!
Leave a Reply